Wing Loading Explained: How to Choose the Right Paraglider Size
August 1, 2026 • 37 views
Share this post:
Two pilots borrow the same glider. The 62 kg pilot launches and finds the wing feather-light — weak thermals are workable, but any headwind pushes her backwards. The 88 kg pilot fl…
Two pilots borrow the same glider. The 62 kg pilot launches and finds the wing feather-light — weak thermals are workable, but any headwind pushes her backwards. The 88 kg pilot flies that exact same glider and finds it firm and alive, punching through wind beautifully, but by late afternoon when the air goes soft he sinks out before everyone else.
The glider didn't change. What changed is wing loading.
This is one of the most misunderstood numbers in paragliding. A great many pilots believe that flying heavy makes you glide further. It doesn't — and getting this wrong leads to expensive purchasing decisions.
1. What wing loading is
Wing loading is your total flying weight divided by the wing's area:
Wing loading (kg/m²) = Total flying weight ÷ Wing area (m²)
Example: a 24 m² wing with a pilot and all equipment weighing 88 kg → 88 ÷ 24 = 3.67 kg/m².
Arithmetically simple. But both sides of that equation are easy to get wrong.
Total flying weight — weigh the whole backpack
Total flying weight (also called all-up weight) is everything that leaves the ground. Not your body weight. Not your body weight plus the harness.
The accurate method: pack everything into your glider rucksack exactly as you would carry it up the hill, put on your flying clothes, and stand on the scale. The number is usually higher than you expect. A full kit includes:
Glider — 3.5 to 5.5 kg (lightweight versions 2.5 – 3.5 kg)
Harness — 2.5 to 6 kg (pod harnesses heavier)
Reserve parachute — 1.3 to 2.5 kg
Helmet — 0.4 to 1 kg
Vario, GPS, radio, flight deck — 0.3 to 1 kg
Water, food, extra layers, rucksack — 1 to 4 kg
Flybubble's figure is that a full kit typically adds 12–20 kg to your clothed body weight. Hike-and-fly pilots on light gear might get down to 10–12 kg; an XC pilot with a pod harness, water ballast and full kit easily exceeds 20 kg.
This is the single most common mistake we see: a 70 kg pilot looks at a wing rated 70–90 kg and concludes they're at the bottom of the range. In reality, with 16 kg of gear their all-up weight is 86 kg — near the top.
Wing area — flat or projected?
Glider specifications quote two area figures:
Flat area — the wing spread out on the ground and measured. Always the larger number.
Projected area — the wing's shadow in flight, which is the area actually generating lift. Roughly 12–18% smaller.
Most people calculate wing loading from flat area, and that's the industry default. Just remember one thing: compare like with like. If you calculate wing A's loading from flat area, calculate wing B the same way, or the comparison is meaningless.
What counts as normal?
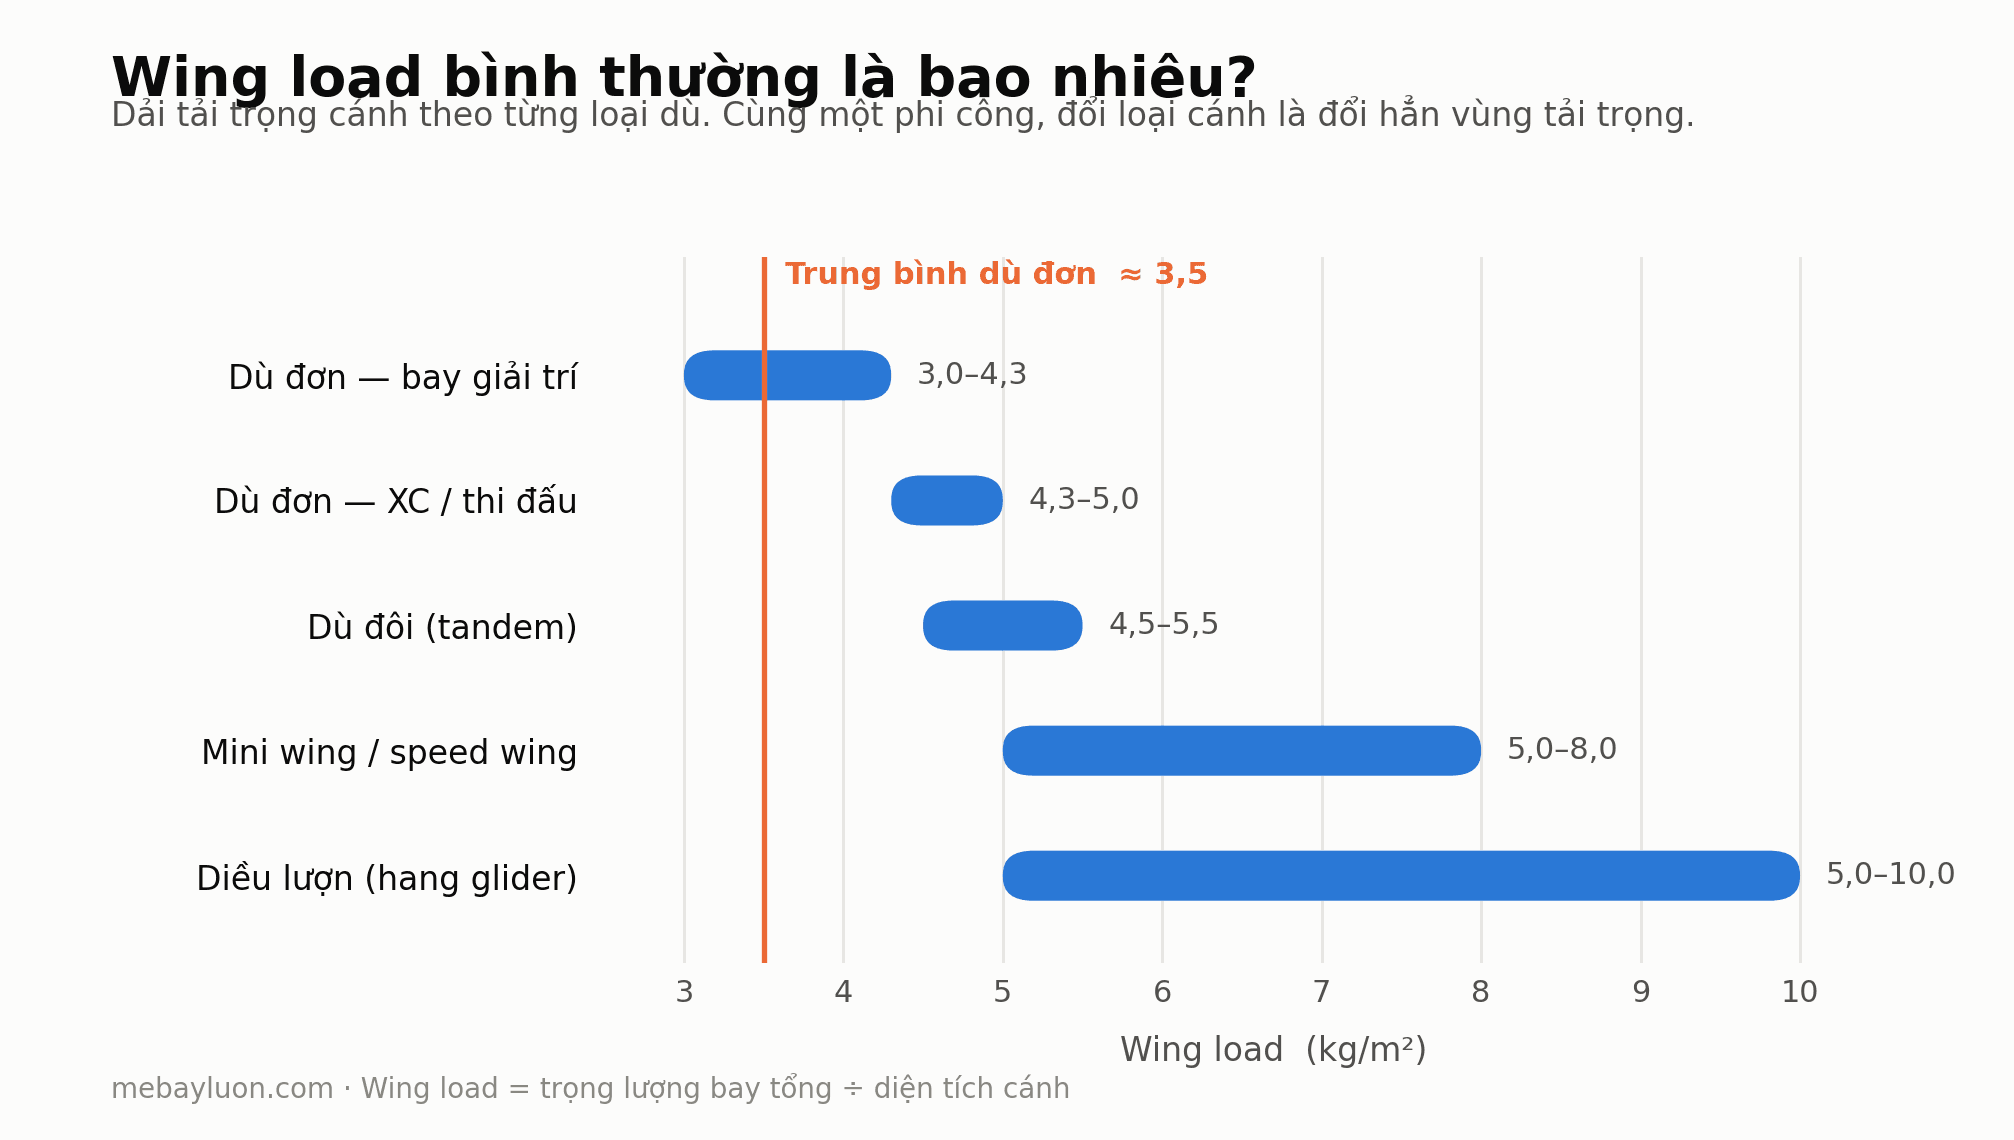
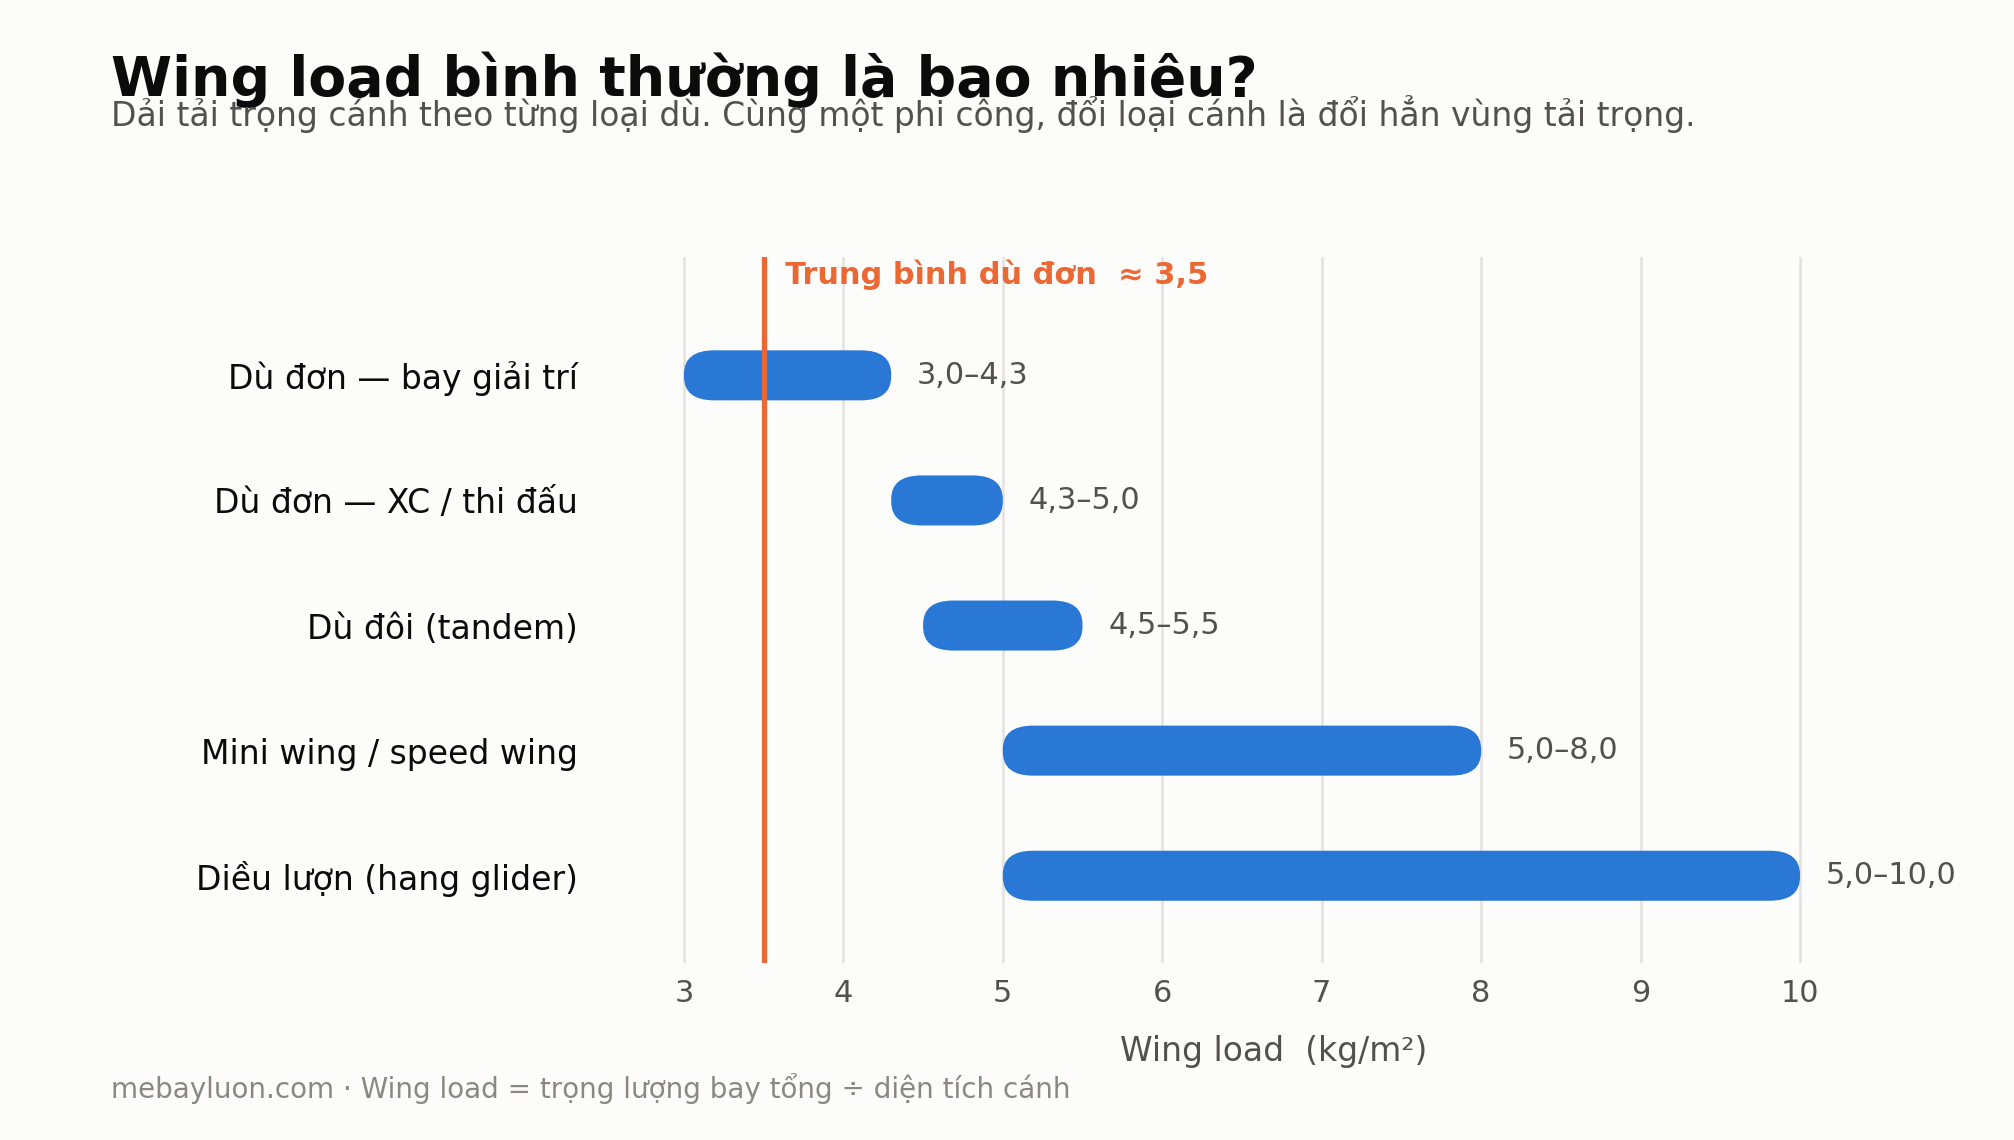
Solo recreational glider — 3.0 to 4.3 kg/m²
Solo competition / heavily loaded XC — 4.3 to 5.0 kg/m²
Tandem — 4.5 to 5.5 kg/m²
Mini wing / speed wing — 5 to 8 kg/m²
Hang glider — 5 to 10 kg/m²
The average for a solo paraglider sits around 3.5 kg/m². Fly tandem and the loading is markedly higher — and you feel it in the brakes immediately, especially with a heavy passenger.
Typical wing-load ranges by wing type. Recreational solo gliders sit around 3.0–4.3 kg/m²; mini wings and hang gliders live in a different world.
2. The underlying rule: the square root
This is the core of the whole article. If you remember one thing, remember this.
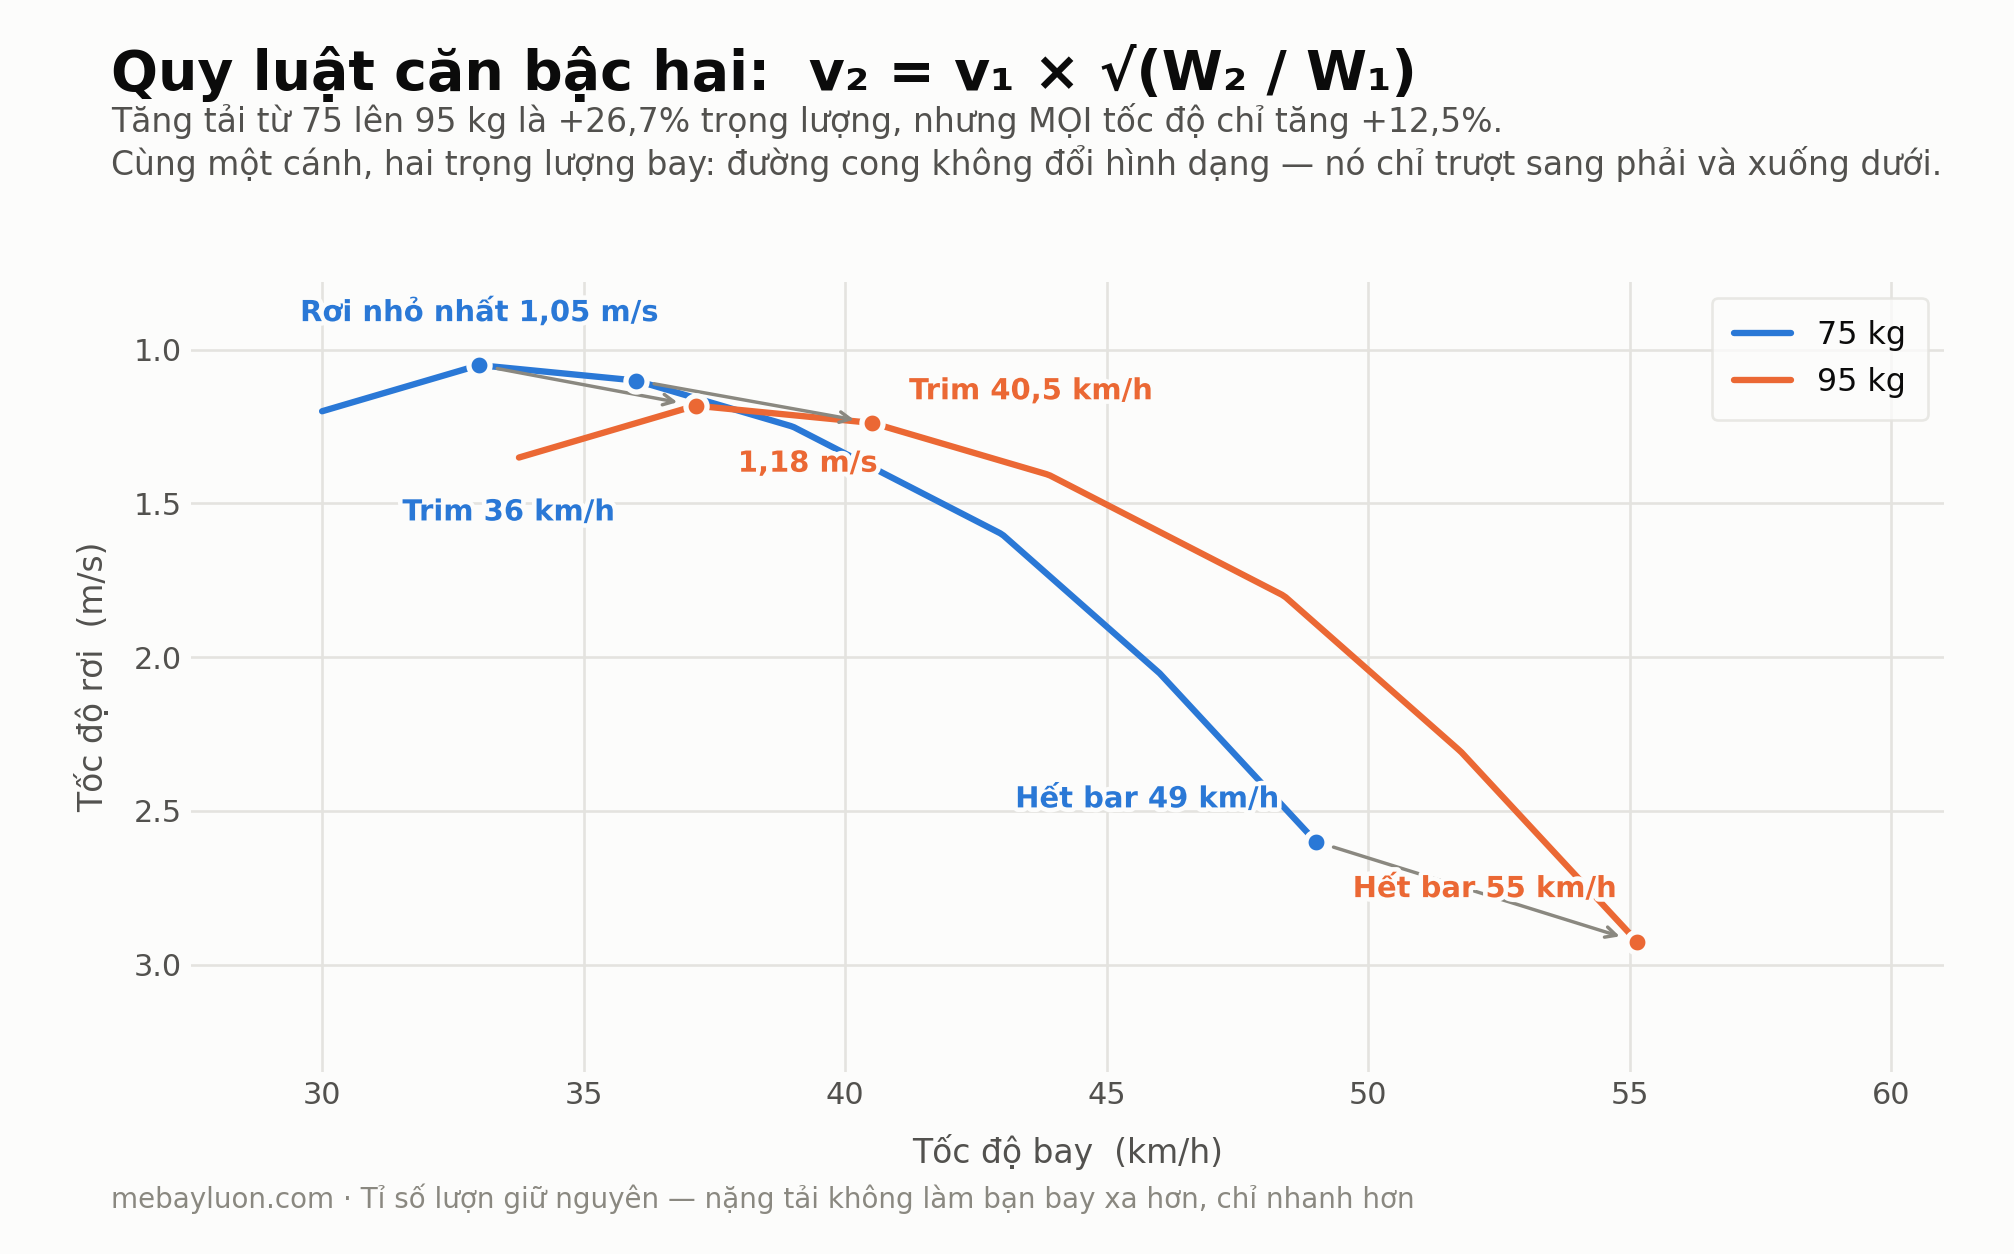
When you increase the load on a wing without distorting it, every speed increases with the square root of the weight ratio:
v₂ = v₁ × √(W₂ / W₁)
Forward speed. Sink rate. Stall speed. All multiplied by the same factor.
Bruce Goldsmith puts it neatly in 50 Ways to Fly Better: if you could double your weight without deforming the wing, your speed would only rise by a factor of 1.41 — the square root of two.
And here is the consequence that matters most:
Because forward speed and sink rate are multiplied by the same factor, the ratio between them — the glide angle — DOES NOT CHANGE.
Flying heavy does not make you glide further. You descend along the same angle, just faster, and you reach the ground sooner in terms of time.
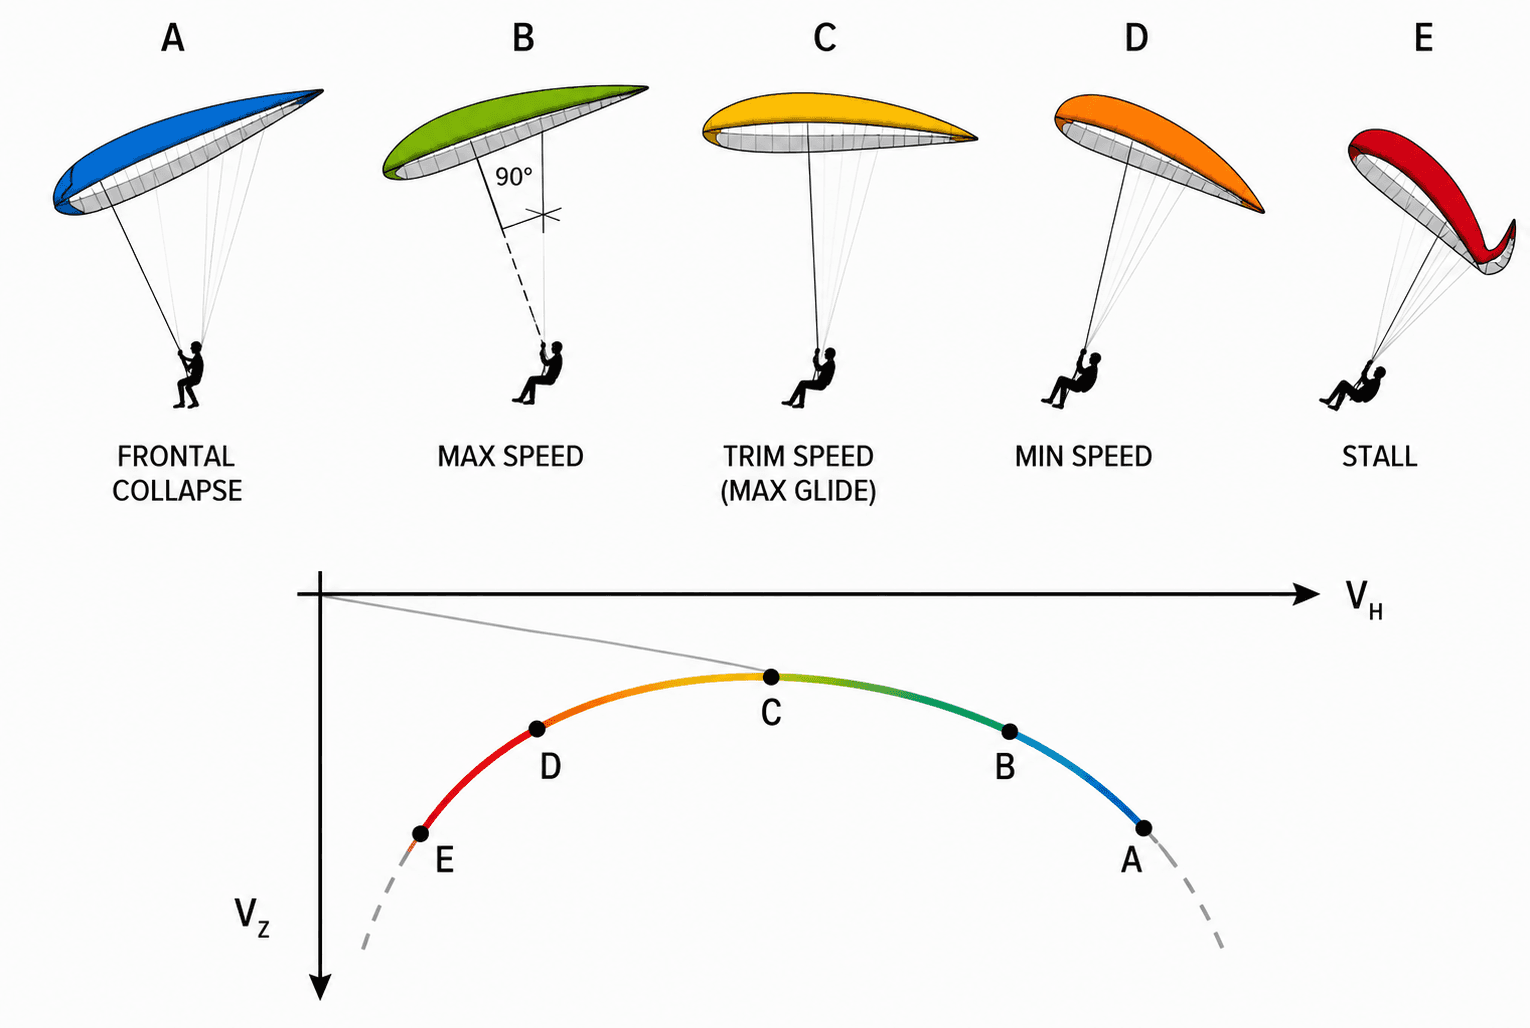
If you aren't yet comfortable reading a polar curve, start with our companion article on the polar curve. The rest of this piece will be much easier to follow.
Here are the numbers for a 24 m² wing certified 75–95 kg:
Trim speed (hands up) — 36 km/h at 75 kg · 40.5 km/h at 95 kg · +12.5%
Minimum sink — 1.05 m/s at 75 kg · 1.18 m/s at 95 kg · +12.5%
Full speedbar — 49 km/h at 75 kg · 55 km/h at 95 kg · +12.5%
Best glide — 9.2 : 1 at both loadings · unchanged
Adding 20 kg — a 26.7% increase in load — buys only 12.5% more speed. The square root is a stingy law.
The same wing at 75 kg and 95 kg: the polar keeps its shape and simply slides right and down by exactly √(95/75) = 1.125. The glide ratio is unchanged.
3. Flying at the bottom of the range — lightly loaded
You sit in the lower part of the certified weight range.
How the wing feels. Floaty. The brakes are light and soft, with a dead band before the wing responds. Many pilots describe it as steering a boat — you give an input, then wait.
What you gain:
Lower sink rate. In weak thermals this is everything.
Slower launches and landings, less running — very forgiving for students.
More airtime on light days, early mornings and late evenings.
A lighter carry up the hill, if you've gone down a size.
What you lose:
Speed. Headwind becomes a genuine problem, not a theoretical one.
The wing collapses more often — though in a soft, lazy way.
It's hard to crank the wing back in when a thermal spits you out. The slow response means you drift off the core.
Less information reaches your hands, making thermals harder to read.
Suits: students, low hills, weak conditions, light-wind days, hike and fly, and those late-afternoon flights when you just want to stay up as long as possible.
4. Flying at the top of the range — heavily loaded
You sit in the upper part of the range.
How the wing feels. Firm and alive. The brakes are heavy and give feedback in the first few centimetres. The wing changes direction decisively. The air talks to you more — turbulence comes through the harness clearly.
What you gain:
More speed at every setting. Better wind penetration, more reliable trips home.
Greater control authority: shifting your weight to one side of a well-loaded wing banks it quickly — you can crank into a strong thermal core.
Higher internal pressure, so fewer collapses in rough air.
Better feel for the air, which is a real advantage for thermal flying.
What you lose:
Higher sink rate. On weak days you go down first.
When it does collapse, it collapses hard. More energy in the wing, more height lost, faster hands needed. This is the most serious trade-off.
Launches need a faster, more committed run. Landings arrive quicker too — tight landing fields get harder.
On full bar a loaded wing deforms more under air pressure, so the top end of the speed range is less usable than you'd think.
Suits: experienced pilots, high mountains with strong air, windy coastal sites, and XC pilots who need to get home into wind.
5. Where the sweet spot is
There is no single right number for everyone. But there is a broad consensus.
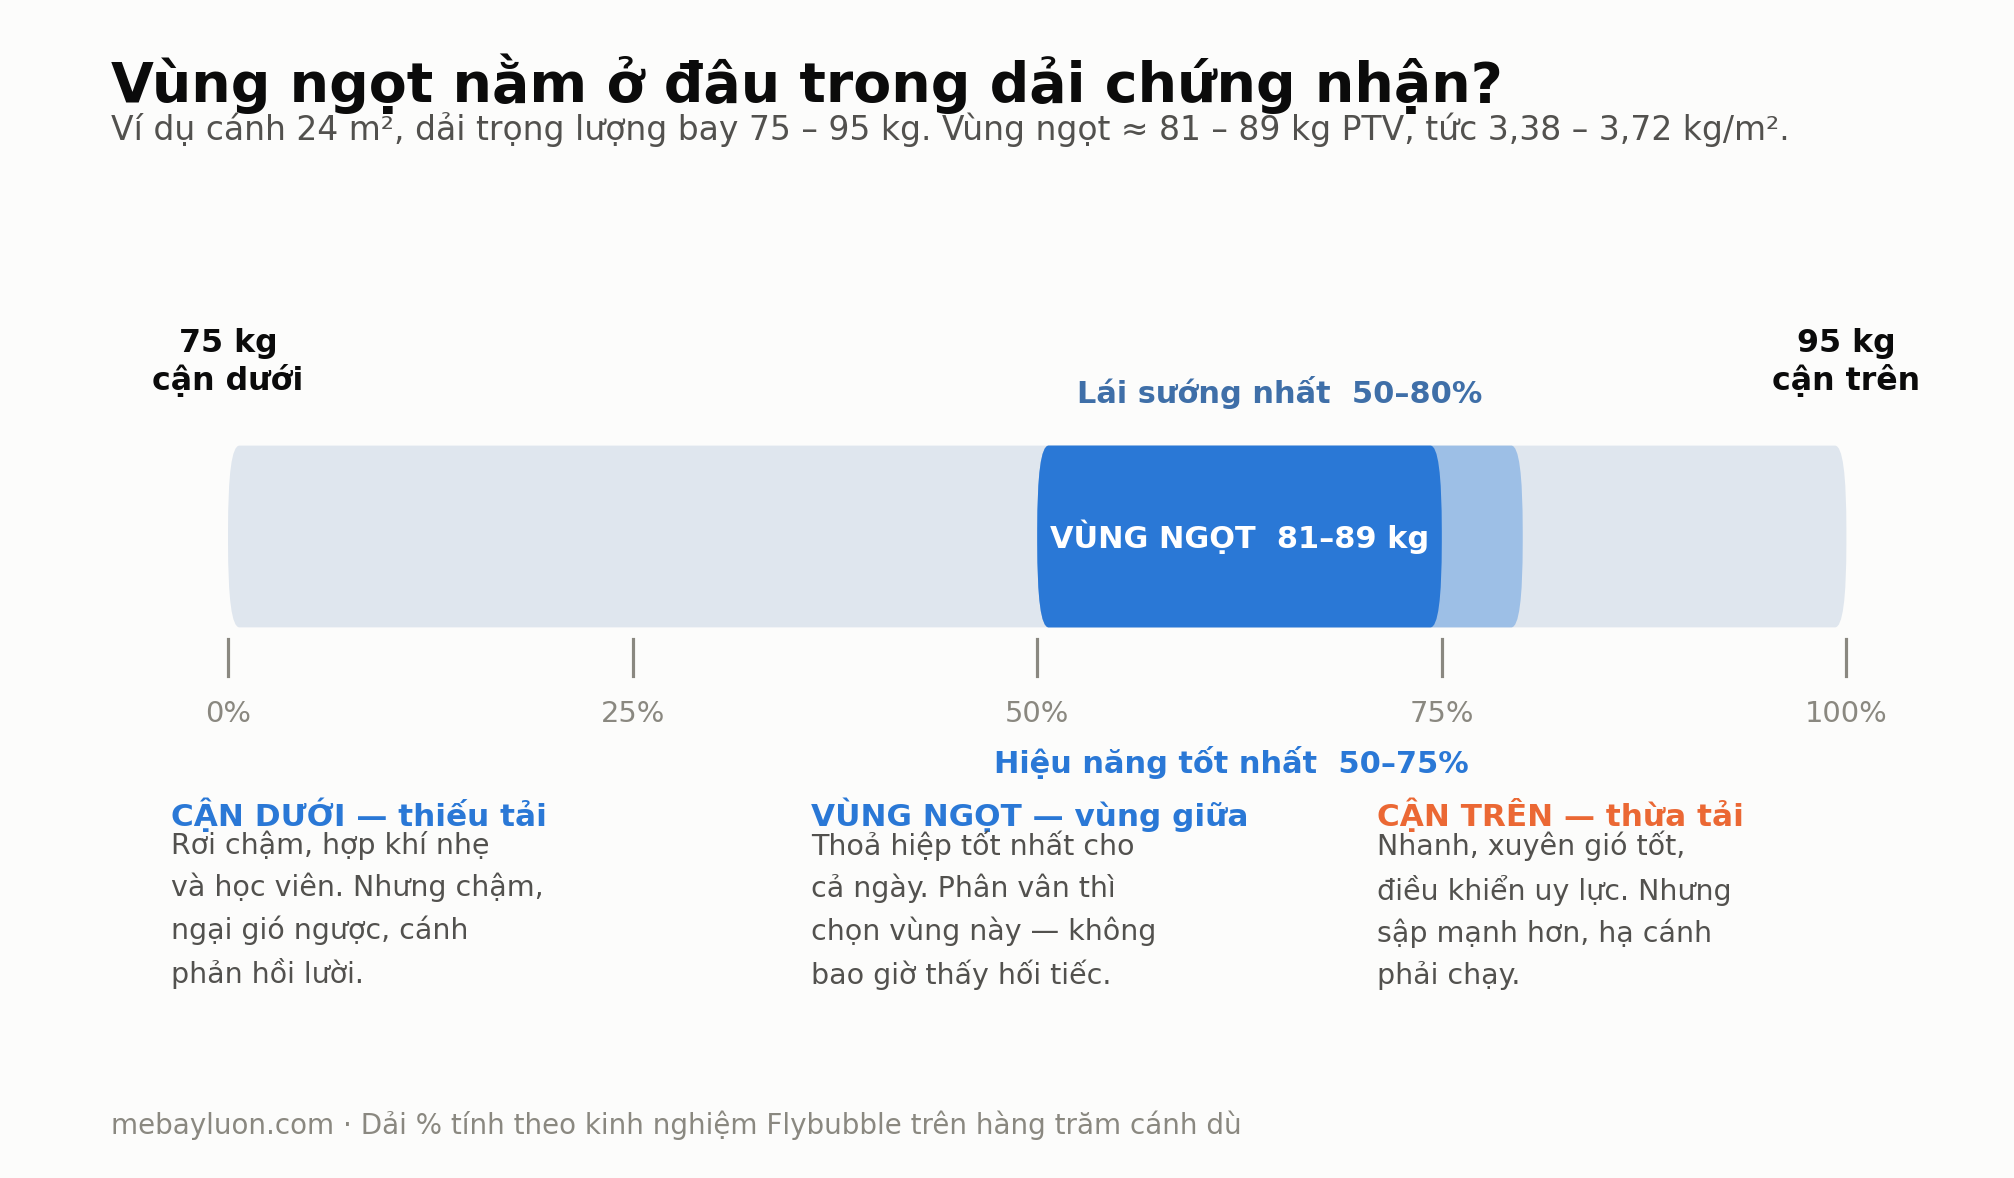
Flybubble's experience, after years of testing hundreds of gliders, is that the best performance band usually falls around 50–75% of the weight range, and the best handling around 50–80% — varying by model and manufacturer.
Separately, many manufacturers advise pilots flying low hills and flatlands to sit in the middle third of the range.
For our 24 m² wing rated 75–95 kg, the sweet spot is roughly 81–89 kg all-up, or 3.38 – 3.72 kg/m².
The deeper reason is that nobody is ever optimised all day. In the morning the air is light and you want to be light. At midday when thermals are punching you want to be heavy. Late afternoon the air dies and you want to be light again. A glider has one loading, so you are choosing the best compromise, not an optimum.
If you're unsure, choose the middle. You will never regret it the way an extreme choice can make you regret it.
The sweet spot on a 24 m² wing certified 75–95 kg: about 81–89 kg AUW, i.e. 50–75% of the range. When in doubt, pick this zone.
6. Matching wing loading to where you fly
This is where theory meets the ground.
Headwind changes the maths
In still air, heavy and light glide identically. Add a headwind and the whole curve is dragged to the left — and the faster wing keeps more of its glide. For our 24 m² example, glide measured over the ground:
Still air — 9.2 at 75 kg · 9.2 at 95 kg · 0% difference
10 km/h headwind — 6.9 at 75 kg · 7.2 at 95 kg · 4% difference
20 km/h headwind — 5.0 at 75 kg · 5.4 at 95 kg · 8% difference
30 km/h headwind — 3.2 at 75 kg · 3.8 at 95 kg · 18% difference
The stronger the wind, the bigger the advantage of being heavy. That is the physical reason — not a matter of taste — behind the advice to load up for coastal flying.
A quick guide for Vietnamese flying sites
Khau Pha Pass (Mu Cang Chai) — big vertical relief, strong midday thermals in summer → upper-middle to top
Son Tra (Da Nang) — coastal, steady sea breeze that can get strong → top
Muong Hoa (Sa Pa) — high mountains, cloud inversions, varied by season → middle to upper-middle
Doi Bu, Vien Nam (Hanoi) — low hills, generally gentle air → middle
If you own one glider and fly all of these — which describes most pilots in Vietnam — choose for the site you fly most often, not the one that impresses you most.
7. Ballast: almost always a waste
The next question everyone asks: "Can I just carry water to get heavier?" In principle, yes. In practice, it's close to pointless.
Flybubble measured it directly: adding 20 kg to an EN D wing rated 85–105 kg raised trim speed by 3 km/h and top speed by 5.6 km/h. Sounds useful — but nobody carries 20 kg of ballast. The practical limit in a harness is around 4 kg; beyond that it's unwieldy and unbalances your seating position. At 4 kg the gain shrinks to roughly 0.8 km/h at trim and 1.3 km/h on full bar.
Cross Country Magazine gives a comparable figure: even 10 kg of ballast raises speed by only about 3% — from 36 km/h to 37.1 km/h. Not enough to save you from being blown over the back when the wind picks up.
Ballast also worsens your sink rate, so you spend longer circling in thermals — potentially losing more time than you gained on the glides.
In competition, 1% can be a placing. For recreational flying, ballast is a hard carry up the hill in exchange for almost nothing. Buy the right size instead of compensating with water.
8. Downsizing for speed — the trap
The logic sounds sound: smaller wing → higher loading → more speed.
Arithmetically, dropping a size does a bit more than 4 kg of ballast. Flybubble worked an example: a 95 kg pilot moving from a 27 m² (rated 90–115) to a 25 m² (rated 75–100) gains roughly the equivalent of 7 kg. In theory that's about 1.5 km/h at trim and 2.5 km/h on full bar. But there are two problems.
First, small wings are inherently less efficient. Many manufacturers deliberately design smaller sizes with lower wing loading. You think you're moving up the weight range; the actual gain is smaller than expected.
Second, Reynolds number. A larger wing has a larger chord, a higher Reynolds number, and proportionally lower drag. This is one reason experienced pilots and designers tend to say big wings glide better, all else being equal. Downsize and you may lose glide.
The conclusion: don't chase speed by downsizing. There are more important things to weigh up.
9. Reading manufacturer specifications
Three abbreviations you'll encounter:
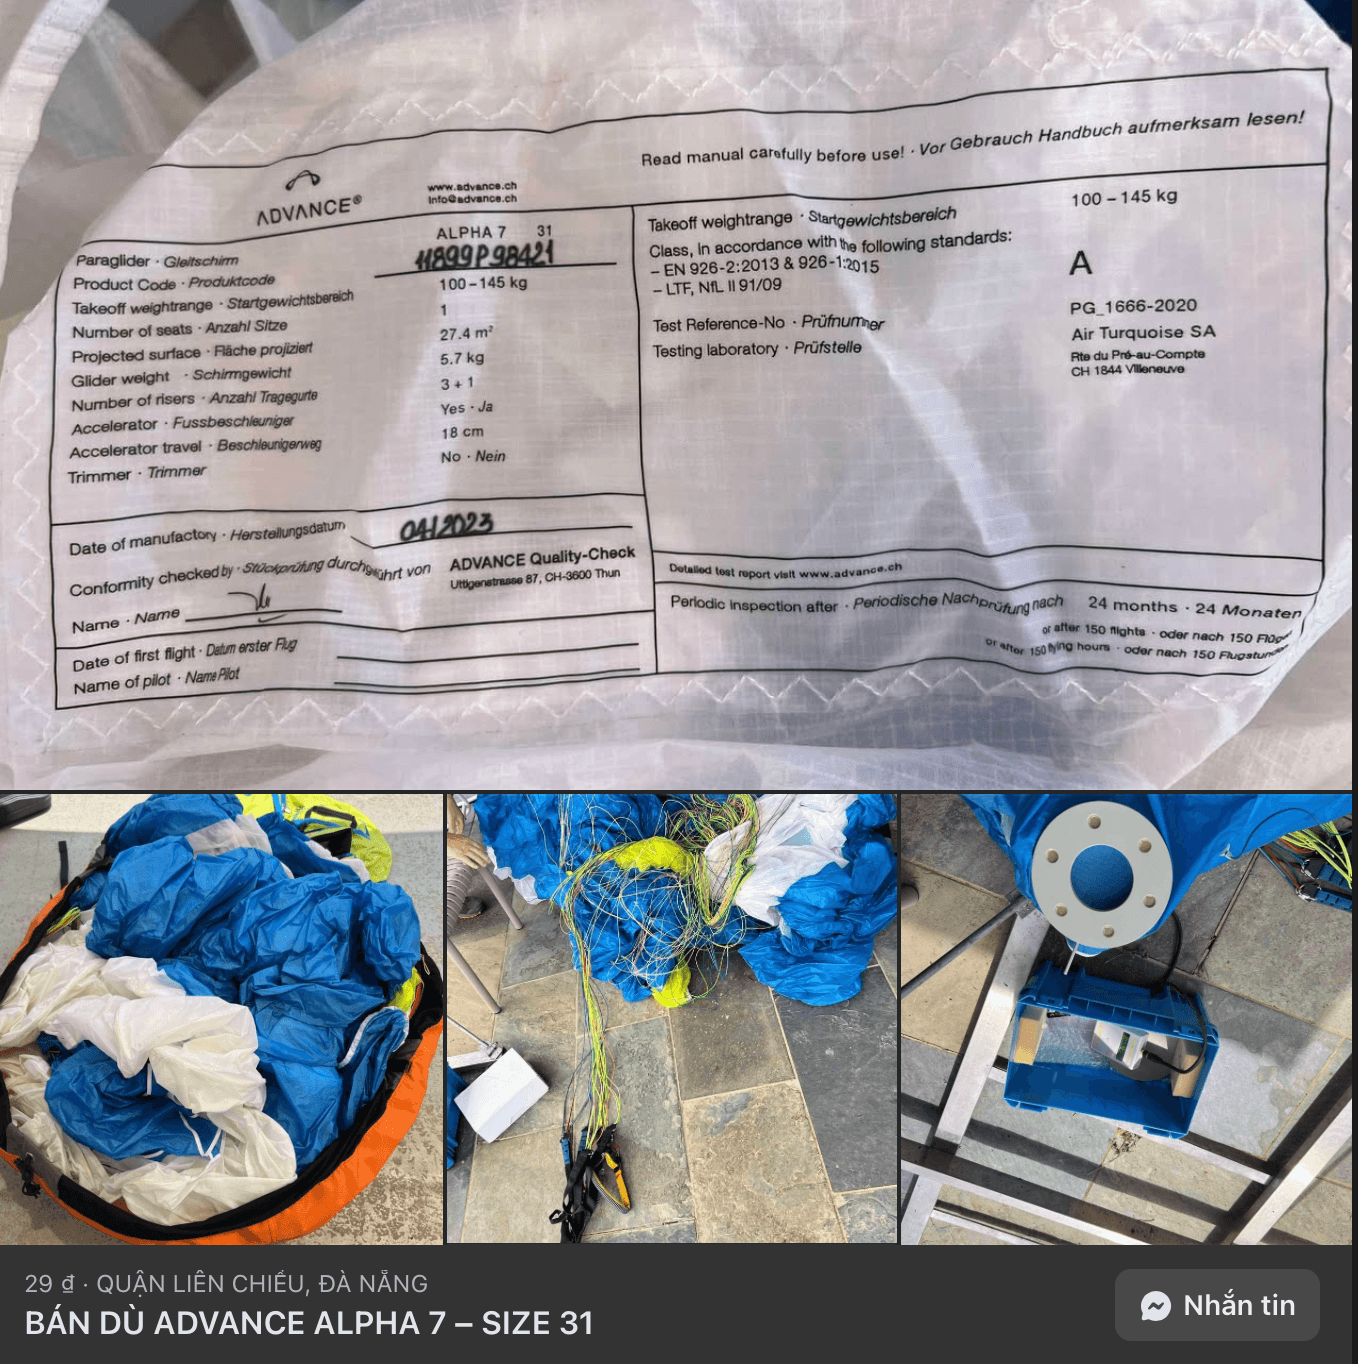
CWR — certified weight range. The wing has been tested at both ends of this range and met the EN/LTF standard at its published class. This is the legally meaningful range.
RWR — recommended weight range. Narrower than the CWR. Where the manufacturer knows the wing flies best. If a model publishes an RWR, weight it more heavily than the CWR.
EWR — extended weight range. Sometimes certified at a higher class. A wing may be EN A within its CWR but EN B or C at the edges of its EWR. Read this carefully.
Some rules worth knowing:
Ranges narrow as wings get smaller. A 22 m² size might be 50–70 kg (a 20 kg range), while the 31 m² size of the same model is 100–130 kg (a 30 kg range).
Ranges narrow as the class goes up. An EN A might be a generous 75–100 kg; an EN D might be just 85–97 kg. The higher the class, the more your position in the range matters.
EN A and EN B wings usually come in more sizes with more overlap, giving you more choice. Higher classes have fewer sizes and less overlap.
Some manufacturers certify the widest range they can to maximise their market. In reality the wing only flies well across a much narrower band. Being inside the CWR does not mean you are in a good place.
One note on powered paragliding: some wings carry an additional DGAC certification for paramotor use at higher weights. This is self-declared by the manufacturer and does not include recovery testing from extreme flight states. The BHPA does not treat it as independent verification. Don't use a DGAC figure to justify overloading a wing in free flight.
What if you fly outside the range?
The wing still flies. But:
It is no longer certified. Retested at that loading it would likely fail — or drop a class.
Insurance and liability may be affected. In Vietnam, flying operations may refuse to let you launch.
At a competition weigh-in, you're disqualified.
The manufacturer didn't certify it at that weight out of laziness, but because it isn't a good operating point for the wing.
If you love strong wind and feel you need loading above what the range allows, what you need is a wing designed for that — a mini wing, for instance — not extra weight stuffed into your current glider. And mini wings demand their own skill set.
10. A seven-step process for choosing your size
Step 1. Weigh yourself properly. Full flying clothes, everything in the rucksack, on the scale. Record two numbers: minimum all-up weight (short flights, minimal kit) and maximum (XC, full water and warm layers). The gap is usually 2–5 kg.
Step 2. Choose the EN class first, size second. Class determines passive safety far more than wing loading does. A well-loaded EN B is still passively safer than a lightly loaded EN D. Don't reverse this order.
Step 3. Define your dominant conditions. Not your dream flight — the 80% of flights you'll actually make in the next year.
Step 4. Pick a target position in the range. Low hills and light air → middle. Strong mountains or windy coast → upper-middle to top. Unsure → middle.
Step 5. Filter by weight range, across brands. This is the step most often skipped. Every manufacturer divides sizes differently, and brand loyalty can strand you in a bad spot. If your all-up weight is 92 kg and your favourite brand only offers 75–95 and 90–115, look elsewhere — someone may make an 82–102 that fits perfectly.
Step 6. Check both ends of your all-up weight. Both your minimum and maximum should sit inside the range, and ideally both inside your target band.
Step 7. Test fly if you can. Nothing replaces the real feel. If a test flight isn't possible, ask the manufacturer directly — they have the strongest interest in you being happy with the wing.
11. Eight common mistakes
Weighing yourself without gear and comparing to the weight range. You're 12–20 kg short. This is mistake number one.
Believing heavier means further. It doesn't. Glide angle is unchanged.
Buying ballast instead of the right size. Carrying weight up the hill for less than 1 km/h.
Downsizing for speed. Very little speed gained, possibly glide lost.
Staying loyal to a brand that puts you in a bad spot in the range. The wing doesn't know which logo you love.
"It's only 3 kg over the range." The wing loses its certification at the first kilogram over.
Taking advice from pilots with different needs. A competition pilot in the Alps and a weekend pilot at Doi Bu need different answers.
Comparing one brand's flat area to another's projected area. A 12–18% difference — enough to reach entirely the wrong conclusion.
12. Frequently asked questions
I weigh 58 kg and I'm at the bottom of every range. What do I do?
You need an XS or S, and not every manufacturer does small sizes well. Look for brands with a genuine light-pilot line, and consider a lightweight glider and harness — but note that light gear reduces your all-up weight, pushing you even lower in the range. Sometimes a heavier standard kit is a light pilot's friend.
Does wing loading affect stall speed?
Yes. Stall speed also rises with the square root. A heavily loaded wing stalls at a higher speed, meaning the margin between flying speed and stall changes, and the consequences of a stall are more energetic.
What about flying at altitude?
Thinner air raises all true airspeeds — exactly the same effect as increasing wing loading, and it compounds with it. At Khau Pha or Sa Pa, launching above 1,500 m, the wing is already "faster" than the same wing at Son Tra. If you're already heavily loaded, factor this into your landing field choice.
Does temperature matter?
Yes, by the same mechanism. On hot days the air expands and thins, and all speeds increase. Midday in June at Mu Cang Chai is a different wing from a December morning.
Do high aspect ratio wings want higher loading?
Yes. Higher aspect ratio wings are aerodynamically more efficient, so their optimal loading shifts upwards. This is one reason high-class wings are typically flown heavier.
Whose advice should I trust on where to sit in the range?
The manufacturer of that specific model, first. Then an instructor who has seen you fly. The internet is full of contradictory advice, most of it people projecting their own preferences onto you.
Conclusion
Wing loading is not a performance dial. It is a set of trade-offs, and which trade-offs suit you depends on the sky you fly under. Three things to take away:
Weigh the whole kit. Every other calculation is meaningless if the input is 15 kg wrong.
Heavier does not glide further. Just faster, and sinking faster, in the same proportion.
Buy the right size; don't compensate with ballast. And if in doubt, aim for the middle of the range.
This article is not a substitute for an instructor. Equipment choice is a safety decision, not just a performance one. If you're choosing your first wing or considering a step up, talk to someone who has watched you fly.
Flybubble Paragliding — Paragliders: weight ranges and wing loading, part of the Choose The Right Paraglider series (flybubble.com)
Flybubble Paragliding — Paraglider weight ranges: the numbers (flybubble.com)
Cross Country Magazine — Tuesday Tip: Wing loading and ballast, from 50 Ways to Fly Better by Bruce Goldsmith (xcmag.com)
SkyNomad — Wing Loading (skynomad.com)
EN 926-2 / LTF certification standards; the APPI training system (flyappi.org)
The polar curve figures in this article were modelled by Mebayluon using the square-root scaling law, to illustrate the principle. Real figures vary by glider design, temperature and altitude.