🚀 Forward motion
After learning how the airflow around the wing profile creates lift, keeping us in the air, we may wonder how this airflow is created when there is no engine pushing us through the air?
Why do paragliders fly forward?
Because the specific wing profile has the ability to transform downward motion into forward force and motion. The downward motion is driven by Earth’s gravity and the paraglider’s weight, including the pilot and wing. This downward motion creates an airflow coming from below, which interacts with the specific wing profile to create forward force and motion. ▶ For example, if we put a body with circular symmetrical profile into a constant vertical flow, the acceleration of the flow around the sides will produce two self-balancing sideways lift forces, Ry. ▶ If the body’s profile has a semicircular shape, then there will be only one unbalanced sideways force, Ry, meaning the downward motion will create sideways force and motion. The same analogy is valid for the classic wing profile, where the roundness around the leading edge creates forward suction.
The downward motion is usually driven by the weight force; i.e. a weightless wing cannot fly forward, and the more loaded a wing is, the greater forward force and motion it creates.
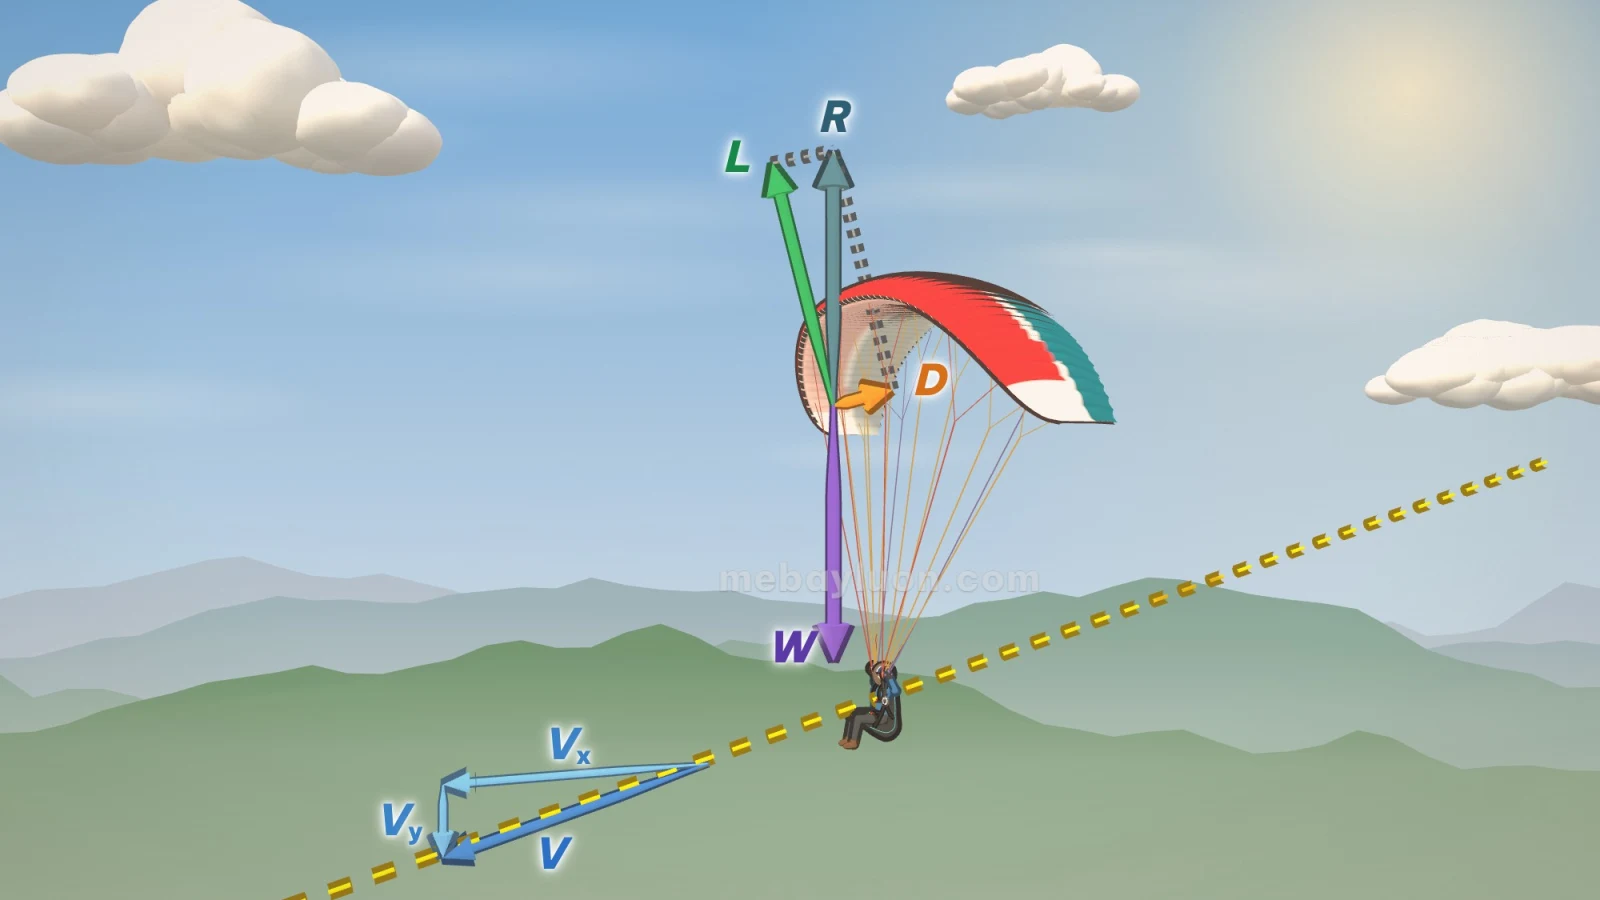
✨ The magic is the shape! The wing can be made of wood, sail, metal, fiberglass, but its specific profile shape is what makes it fly forward. Two wings with identical shape but different mass glide along the same trajectory, just the heavier one flies faster, both vertically and horizontally. In aerodynamics, forces, velocities and accelerations, or their components parallel to the Earth surface, are called horizontal and are marked with the index “x” (e.g. Fx, Vx, ax). Components perpendicular to the Earth’s surface are called vertical and are marked with the index “y” (e.g. Fy, Vy, ay). Apart from the “Earth’s” point of view, exactly the same forces, velocities and accelerations can be seen in relation to the wing surface. ▶ Components parallel to the wing surface are called tangential and are marked with the index “T” (e.g. RT, aT). ▶ Components perpendicular to the wing surface are called normal and are marked with the index “N“. Using the wing as a reference system with its normal RN and tangential RT components of the aerodynamic force is needed for explaining the self-driven gliding flight. The other components – lift (Ry) and drag (Rx) come from engine-driven airplane aerodynamic theory and cannot explain the forward motion and paragliding dynamics. The wing has the inductive ability to transform normal (perpendicular to its surface) motion and airflow (VN) into tangential (forward and along its surface) force (RT). In physics, induction means indirect influence. Indirect, because the object does not move in the same direction as the force acting upon it but it moves in a completely different direction. The gravity pulls the wing downward, but it reacts by going forward. The more you pull it, the faster it flies. The inductive ability depends on: ▶ The shape of the profile. It’s more pronounced with thicker profiles with a bigger top surface curve and roundness around the leading edge; ▶ Airspeed. The higher, the stronger the inductive ability. That’s why stall recovery of small-sized wings causes more aggressive forward surges; ▶ Angle of attack. The higher the angle of attack, the bigger the share of normal component VN from the overall airspeed V (more air comes from below, perpendicular to the bottom surface). There is an optimum angle of attack range where RT and inductive ability are the strongest, depending on the shape of the profile. Too high angles of attack are not the best as they engage only a small part of the wing’s surface (the curve at the nose of the profile). Note that forces like RT have an accumulative effect – the longer you let it work, the greater acceleration aT and forward motion it will produce. If we drop a paraglider in the air, it will accelerate downward pulled by gravity. This creates an airflow from below which is additionally accelerated by the roundness of the leading edge, creating suction and forward force there. This tangential force RT will add horizontal motion to the vertical fall. Initially 90°, the angle of attack will decrease, and airflow will come from a new direction, engaging a larger part of the curved top surface behind the leading edge (camber). This adds more forward motion, which further engages the top surface and starts producing lift until a balance is reached. The vertical fall transforms into a gliding flight forward.
Another example of inductive ability is the rising of the wing during takeoff. It demonstrates that the forward force and motion can be created without using gravity as an engine when the wing is not horizontal.
The inductive ability explains a lot in paragliding! It helps understand what happens if you sit too early at takeoff, paraglider’s stability and behaviour in thermals and turbulence, wind gradient effect, acrobatics, spirals, stalls, spins, collapses, take offs when pulled by a winch, why shark-nose profiles are more prone to stall, etc. etc.
🦅 Gliding flight
The inductive ability cannot accelerate the wing indefinitely. The more forward motion is added, the more the angle of attack decreases, directly reducing the forward motion engine – the tangential force RT. The rise of airspeed also increases exponentially (V²) the drag of elements carried by the wing – lines, pilot’s body, and harness. Thus, at a certain moment, equilibrium of forces is reached, and a gliding flight is established – uniform linear forward motion with a slight descent.
Usually, gliders don’t change their weight during a gliding flight, and even if they do so (e.g. dropping a ballast), this doesn’t change the ratio between acting forces. The only way to change a paraglider’s gliding trajectory is to change its angle of attack. ▶ The angle of attack can be increased by pulling the brakes. This folds down the trailing edge, increases the profile curve, and its interaction with airflow. A more curved profile produces more lift but also more drag. The glider goes to a new flight mode with slower speed and descent and with steeper gliding trajectory. At a certain point, the minimum sink mode (Vy min) is reached, which gives maximum flight time duration (t). If we continue pulling the brakes and increase the angle of attack, we’ll reach the minimum or stall speed. A stall starts beyond it. ▶ The angle of attack can be decreased by the speed system, where pushing a stirrup with our legs, pulls a rope, which pulls consecutively down A, B and C risers. The wing goes into a new flight mode with higher speed and descent and also a steeper gliding trajectory. With the fully applied speed system, we reach the minimum angle of attack and the maximum speed flying mode (Vx max). When the brakes or the speed system are released, balanced (trim) flight mode restores, which is usually the best glide ratio mode (Vx/Vy = max). It gives maximum gliding distance.
Regardless of the flying mode, the gravity and the inductive ability are the engine of the gliding flight. The height is the fuel.
🌍 Why do we need different flight modes?
Usually, the paragliders are balanced to fly at the best glide ratio (trim speed), but this is in relation to the air or to the ground when there is no wind. When the wind blows (the air mass moves along the ground): ▶ if it’s a headwind, then its speed (Vx wind) is subtracted from the horizontal component of airspeed (Vx) to obtain the speed of movement relative to the ground Vx ground = Vx – Vx wind. ▶ And vice versa – if it’s a tailwind, then its speed is added to the airspeed to obtain the ground speed Vx ground = Vx + Vx wind. In both cases, the flight duration time (t) is the same (speed of descent Vy=const), but we cover different distance (s) along the ground as s = Vx ground * t.
If the headwind speed is higher than the paraglider’s airspeed, then we will fly backward in relation to the ground but forward in relation to the air. The airspeed, or the feeling of wind on pilot’s face, is the same, whether flying with a 20 km/h tailwind, no wind, or with a 300 km/h headwind because there is exactly the same airflow, angle of attack, and aerodynamic force. The paraglider’s weight (G), wing’s profile and inductive ability make it move through the airmass, which has its own movement relative to the ground.
When a paraglider flies through sinking air (-Vy wind), it increases its speed of descent relative to the ground (Vy ground = Vy – Vy wind), reducing the flight duration time (t) and distance (s), while the ground speed (Vx ground) and airspeed (Vx) remain the same. And vice versa. When a paraglider flies through rising air (+ Vy wind), this speed is added to the paraglider’s speed of descent through the air Vy, and the paraglider decreases its speed of descent relative to the ground (Vy ground = Vy + Vy wind). This increases flight duration time and distance relative to the ground. If the airmass rises faster than the paraglider’s own descent through the air (Vy wind > Vy), then the paraglider will gain height relative to the ground (Vy gr > 0). Again, no matter if we fly in rising or sinking air, the angle of attack, aerodynamic force, airspeed and feeling of wind in our face is the same, determined by our flying mode – how much brakes or speed system is applied. Usually, pilots try to increase their gliding distance by changing the flight mode (angle of attack), which partly compensates for or takes advantage of the influence of the wind. If we want to glide further, we should fly slower in a tailwind or rising air and faster in headwind or sinking air. Beginners should remember that in head wind or sink, they’ll fly shorter distance and in a tailwind and lift they’ll fly longer. So, they should be prepared to land in different place, than initially planned. The shorter gliding distance also means less choice of landing places.
🪂 Paraglider Control Mechanisms
A paraglider is controlled using two fundamental principles: Aerodynamic Control and Balanced Control. ▶ 🌬️ Aerodynamic Control: This is activated by moving or bending specific parts of the wing's surface. By doing so, the pilot changes both the magnitude and the direction of the aerodynamic forces acting on the wing. ▶ ⚖️ Balanced Control: This involves shifting the alignment between the weight force G and the aerodynamic force R until a new equilibrium (flying mode) is established. The aerodynamic force acts on the Centre of Pressure (CP), while the weight G originates from the Centre of Gravity (CG), located near the pilot’s midsection. This control is achieved through weight shifting.
🛑 The Braking System: Mechanics & Applications
The brakes serve as the primary aerodynamic controls. They function as follows: ▶ The Mechanism: Pulling both brakes evenly folds down the trailing edge of the wing, creating additional drag. This slows the wing down relative to the pilot, increasing the Angle of Attack (AoA). While this temporarily boosts lift, it eventually slows the entire aircraft. ▶ New Flight Modes: If the brakes are held in a specific position, the glider stabilizes into a new flight mode characterized by a steeper gliding trajectory, lower airspeed, and a higher angle of attack.
🎯 Usage & Associated Risks:
▶ Precision Landing: Flying at slower speeds with a steeper glide is ideal for landing in tight spots to avoid overshooting. ▶ The Danger Zone: Operating at low speeds brings the glider closer to stall speed. At this point, the wing becomes vulnerable to turbulence and wind gradients. Furthermore, lower airspeed reduces internal canopy pressure, making the wing much more likely to collapse.
🔄 Turning Techniques
1. THE BRAKE TURN ▶ Pulling a single brake folds the trailing edge of that specific half-wing. This side creates more drag and slows down, while the opposite side continues at normal speed. ▶ The paraglider pivots toward the braked side and will continue to turn until the brake is released. Once released, the glider exits the turn tangentially and resumes straight flight.
2. THE WEIGHT-SHIFT TURN ▶ The Mechanism: The pilot leans their body sideways, shifting the Centre of Gravity. This loads one half of the wing more heavily, causing that side to dip and the wing to bank at an angle γ. ▶ The Physics: The total aerodynamic force R tilts along with the wing. A horizontal component (Rsinγ) is created, which pulls the glider into a turn. The steeper the bank angle, the more powerful the turn becomes. ▶ The Technique: Proper weight shifting requires a full lean. Beginner wings (EN A) are designed for stability and are naturally more resistant to weight-shift turns than high-performance wings (EN D).
⚠️ Safety Critical Warnings
▶ 📉 Increased Descent: When a wing banks, the vertical lift component decreases to Rcosγ. This causes a higher sink rate (Vy) and increased horizontal speed (Vx). Never perform steep turns close to the ground, as the extra descent can be fatal. ▶ 🌪️ The Spin (Half-Wing Stall): If a pilot pulls a single brake too aggressively to force a tight turn, the airflow on that side may "tear" or detach, leading to a stall. This causes the wing to spin violently around its vertical axis. Spins are highly dangerous and can lead to line twists or a cravat. ▶ 🌀 The Spiral Dive: A prolonged, deep brake pull can transition a turn into a spiral dive—a high-speed, high-G rotation. While easier to control than a spin, the 3-5 G-forces can cause blackouts or loss of consciousness in untrained pilots. If not exited with enough altitude, the high vertical speed (10−20 m/s) makes ground impact unsurvivable. 👉 Expert Tip: To fly safely and efficiently, always initiate turns with weight shifting first, then gradually apply brake. This coordination ensures a smooth turn with minimum altitude loss and stays far away from dangerous stall angles. By Nikolay Yotov
Reference: www.skynomad.com
— by Nikolay Yotov