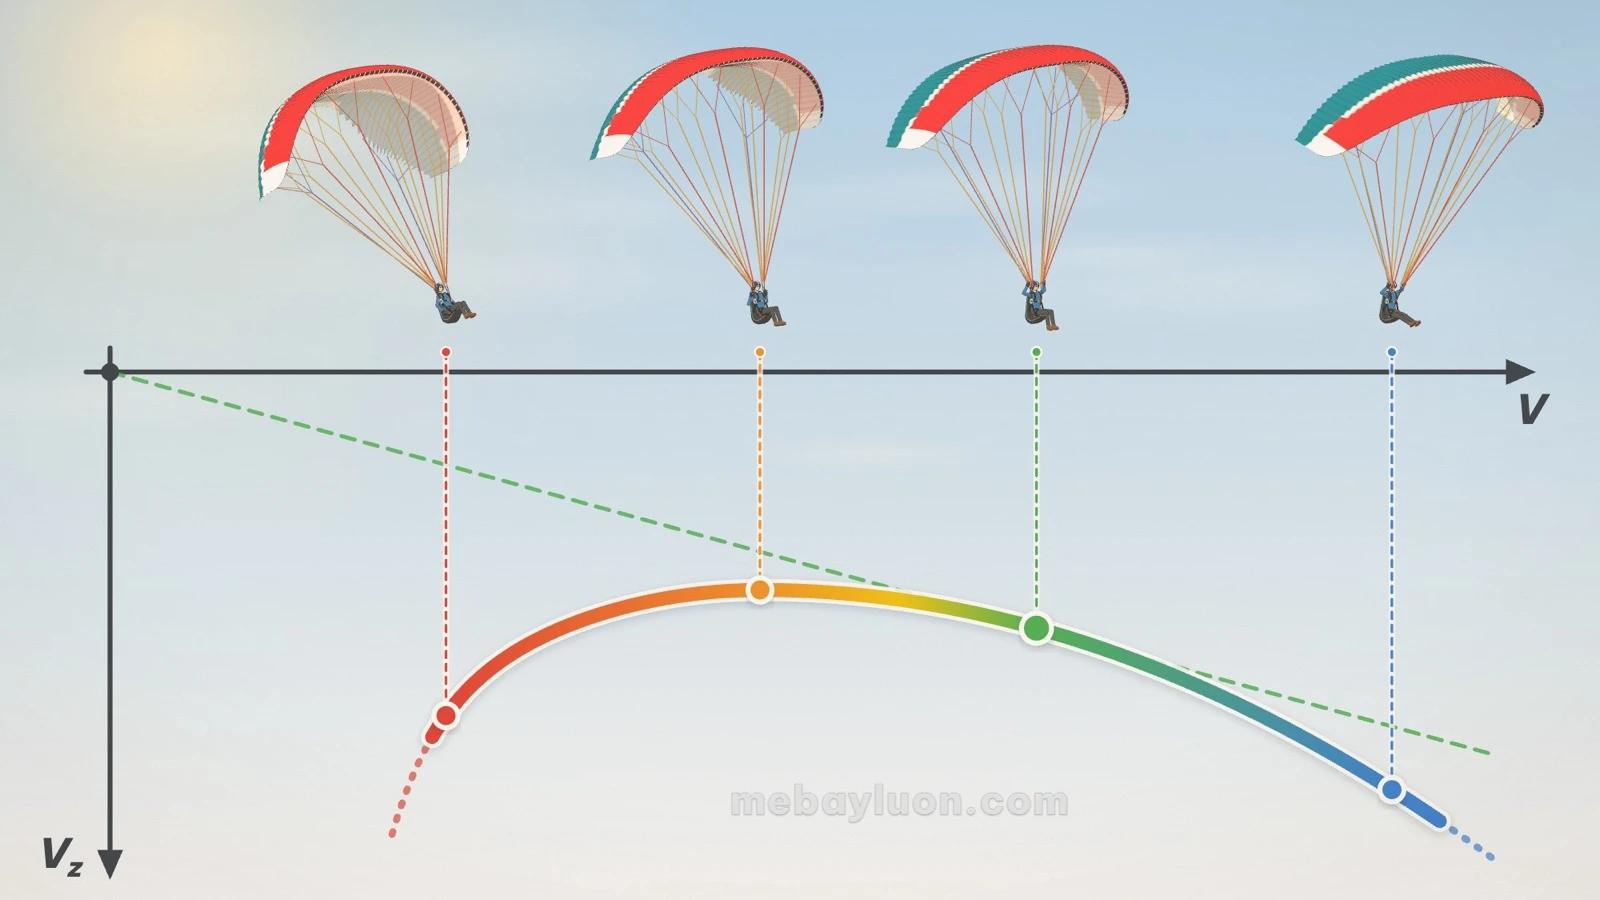
To construct a usable polar curve for a paraglider, or a hang glider, is not necessarily an easy task. The first prerequisite is absolutely calm air – not a common occurrence anywhere. Second is a good memory, or simply a Dictaphone, a vario and a speed probe. Early mornings offer the best chances of recording an accurate polar curve. I won‘t even begin to list all the possible errors that may adversely influence the final result. It is important to know how the polar curve looks in principle. That is useful for optimising our gliding in different situations – it doesn‘t matter so much if the actual polar is dead accurate or not.
🛠️ How a polar curve is acquired
In order to get a sufficient number of coordinates in our coordinate system to draw the polar we simply fly at all the speeds our wing is capable of (for example in 2km/h increments), all the time recording the descent rate corresponding to the different speeds. Once we have all the values (speed/descent) we plot them into the coordinate system. Illustration 10.2 shows a table where the values for a modern sports-class wing have been entered. Notice that both axis‘ are in m/s, so we‘ll have to convert our speed measurements into m/s before entering them into the table. With these numbers we can also calculate our L/D ratio, often referred to as our glide ratio, by dividing A (speed) with B (descent rate).
🦅 How to glide the furthest?
This question is of elementary importance to the XC pilot, particularly when crossing difficult areas. If we‘re crossing a wide valley we normally want to arrive at the other side as high as possible so that we increase our chances of locating lift and continuing the flight. The wing in the example above has an approx. trim speed of 40km/h, at least with the wing loading used for the polar measurements. The best glide angle is calculated to 9.6 in the table. If there‘s absolutely no wind this is then the best speed to glide for long transitions. Note that most paragliders are designed to have their best glide in calm air with the brakes untouched and no speed bar applied.
If in doubt it is always better to glide a little too fast than a little too slow.
— Burkhard Martens
In my personal experience: when flying downwind in weak thermals, the optimal setting is 1/3 speed bar. With no wind, I apply 1/2 bar. If the thermals are moderate and I am safely inside one, I push 3/4 bar to accelerate. If the thermals are strong, I always use full speed bar, even when flying downwind. When flying into a headwind, I can still climb easily on full bar. This rule applies to all high-performance wings; however, for gliders that experience a sharp increase in sink rate when accelerated, caution is needed to optimize the glide.
— Burkhard Martens
🔝 Optimising the climb using the polar curve
It doesn‘t take a degree in maths to work out that the best speed for thermalling is as close to the minimum sink speed as possible. If we return to the example from the previous page it is easy to see that for this particular wing the minimum sink is around the 38km/h mark, in fact not very far from the speed for best glide. It always surprises me when I meet or overhear people saying something along the lines of "there I was with the brakes buried almost to my hips and the others were still climbing better!" One glance at the table is enough to tell us that we get absolutely nothing out of flying too slow.
💨 How to glide with a headwind
If we look at a headwind situation from a polar curve view, we simply change the origin of the tangent line on the X-axis corresponding to the wind speed. The tangent touches the curve further down the slope, indicating that the optimal speed for gliding against the wind is higher than when we wish to go far in calm air.
💡 Practical hints - headwind: If there is up to 10km/h headwind we use only a little speed to 1/3 bar. Around 20km/h it pays to speed around 2/3 of the full range of the speed system, and only when the headwind reaches 30km/h it is worth it to go at fullspeed.
⚠️ NOTE: It is good to be aware of the fact that the glide ratio is severely affected by a headwind. If the wing in the example above flies into a 20km/h headwind the glide ratio is only half of what it would get in calm air, and at 30km/h it is down to an L/D of 2.6. This translates into the understanding that even small valley crossings are all but out of the question if there‘s a strong head wind. 📌 Additional Note: In real-life flying it is rare to be going at full speed on a paraglider. It is only necessary if there‘s a venturi effect stopping us from getting over or around a spur or similar – or on final glides in competitions.
📌 Hint - Crosswind: When flying with a lateral wind we must go slightly sideways ("crabbing") in order to counter the drift. Note that the headwind rules apply – we must speed up to reach best glide. The more lateral wind, the faster we must fly to optimise our glide angle.
⏬ How to fly in a descending air mass
We can also use the polar curve coordinate system to work out how to fly through sinking air. To do this we must move the origin of the tangent up the Y-axis corresponding to the descent rate we meet. Again it is clear to see that the tangent touches the graph further right, indicative of the need to speed up in sinking air.
💡 Practical hints – sinking air: If the surrounding air is sinking 1m/s (the vario is showing app. –2.1m/s and the glide-ratio reduced nearly to the half!!!) we should accelerate 1/2 to 2/3. Once the needle hits -3m/s, corresponding to a surrounding airmass sinking with 2m/s, we must go very fast to escape.
— Burkhard Martens
⚠️ NOTE: When flying through an airmass sinking 2m/s our glide angle is reduced to something like 3.4 almost regardless of whether we‘re going 40 or 50km/h! This means that getting out of the sinking airmass is top priority, either by speeding up or by changing heading. Aside from that we can only hope that we can get through it before we run out of air to fly through.
📌 Hint: If we find ourselves low and desperate it pays to search downwind, i.e. with a tailwind even if it means flying back the way we came from for a while, as this allows us to explore a far greater area than if we keep insisting on going against the wind. It is better to fly a long detour than to be sitting on the ground!
📌 Hint: Because air density decreases with altitude, your true airspeed will increase by about 6% for every 1,000 meters you climb. This is an advantage that allows you to fly further, as you will be moving faster at higher altitudes. However, the most important factor to reach those heights is having strong thermals.
🚀 How to deal with a tailwind
Gliding with a tailwind is great; it gives the impression that one can go on forever. If we look at the coordinate system again we can see that the origin of the tangent line is shifted left, which means that the tangent touches the speed polar curve further left as well. Further left is closer to the speed for minimum sink so it follows that it pays to slow down a little in a tailwind. Notice that the gap between speed for best glide and speed for minimum sink is narrow on modern wings so don‘t overdo the braking part – on the wing used in the examples above we should never slow down to an airspeed of less than 38km/h as this just makes the descent rate increase again!
⚖️ Same wing: bottom or top of the weight range?
Every paraglider is certified for a take-off weight range, for example 75–95 kg. That is the total flying weight: the pilot plus clothing, helmet, harness, reserve parachute, instruments and water — and, for most manufacturers, the wing itself — not just the pilot's body weight. Fly the same wing in the same conditions at the bottom of the range (close to 75 kg) or at the top (close to 95 kg) and the polar curve changes noticeably, and so does the feel of the wing.
📈 How the polar curve changes
As the weight goes up, every square metre of canopy has to carry more (higher wing loading). To produce enough lift for the extra weight the wing has to fly faster. The shape of the polar stays almost the same, but the whole curve is "stretched": every airspeed and every sink rate is multiplied by the square root of the weight ratio, √(W₂/W₁). On the graph the curve moves to the right (faster) and down (more sink).
- Trim speed, top speed (full speed bar) and stall speed all increase.
- Minimum sink increases: when flying slowly, the heavier wing sinks faster than the lighter one.
- The best glide ratio stays almost the same, but it is reached at a higher speed: the same tangent from the origin touches both curves.
- At high speed (on the speed bar), compared at the same airspeed, the heavier wing actually sinks less than the lighter one — for it, that speed is not yet "too fast".
🔢 A worked example
Take a wing with a 75–95 kg weight range. The ratio between the two ends is √(95/75) = √1.267 ≈ 1.125, so every speed goes up by about 12.5%. The figures below only illustrate the calculation; they are not the data of any particular model — for real figures, see the manufacturer's manual.
| Parameter | Bottom of range (75 kg) | Top of range (95 kg) |
|---|---|---|
| Minimum speed (close to stall) | ≈ 23 km/h | ≈ 26 km/h |
| Minimum sink | 1.05 m/s at 32 km/h | ≈ 1.18 m/s at 36 km/h |
| Trim speed (no brakes, no speed bar) | 37 km/h | ≈ 41.6 km/h |
| Best glide ratio | ≈ 9 (at 37 km/h) | ≈ 9 (at 41.6 km/h) |
| Top speed (full speed bar) | 50 km/h | ≈ 56 km/h |
| Sink at full speed bar | ≈ 2.0 m/s | ≈ 2.3 m/s |
Applied to a few real situations (still with the illustrative figures above):
- Climbing in a weak thermal: in air rising at 1.2 m/s, the 75 kg wing still climbs at about +0.15 m/s, the 95 kg wing at only about +0.02 m/s — practically level (before the extra sink from banking in the turn). When the lift is marginal, those few tenths of a metre per second decide whether you stay up or head for the landing field.
- Gliding into a 20 km/h headwind at trim speed: the 75 kg wing makes 17 km/h over the ground, a glide ratio over the ground of ≈ 4.1; the 95 kg wing makes 21.6 km/h, a glide ratio of ≈ 4.7 — about 13% further, and it gets there sooner.
- In still air: both glide almost the same distance from the same height, but the heavier wing arrives about 11% sooner.
🪂 Handling and safety
Flying near the top of the range (high loading):
- The canopy is firmer and more solid (higher internal pressure in the cells), more stable in pitch, and collapses less often in turbulence.
- Better penetration into wind, out of sinking air behind ridges, and through strong conditions — exactly when you need it.
- Heavier, more direct brake feel. At the same bank angle the turn is about 25% wider (the radius grows with the square of the speed), so narrow thermal cores are harder to stay in.
- If it does collapse, the reaction is stronger and faster: the wing turns towards the collapsed side faster, surges harder and loses height faster; the collapsed part usually reopens quickly and energetically. The pilot has to react early and firmly.
- Stall happens at a higher speed, and the touchdown speed is higher too. On landing the wing carries more energy — the flare must be well timed and deep enough. In nil wind, the take-off run is longer.
Flying near the bottom of the range (low loading):
- Lower minimum sink and tighter turns: better climbing in weak thermals and longer soaring on a ridge in light wind.
- Slower: hard work against a strong wind, and easier to be blown back behind the ridge — straight into the sinking air and rotor.
- Softer canopy with lower internal pressure: it deforms and collapses more easily in turbulence, so the pilot must fly actively all the time. Collapses are often slower and softer, but the collapsed part may take longer to reopen.
- Light brakes with long travel, a "loose" feel and slower feedback.
- On the ground, strong wind drags and lifts the pilot more easily during ground handling. Landings are slow and gentle, but a strong headwind on final means very slow progress, possibly even going backwards.
📍 Choosing your loading for your flying and your site
There is no loading that is "right" for every day. Choose for the conditions you fly most and for your style of flying — and always stay inside the certified weight range:
- Strong midday thermals and valley wind — like hot middays at Khau Phạ: the upper half of the range gives a solid wing that penetrates well and collapses less.
- Afternoon soaring, weak thermals, light wind — when the Khau Phạ thermals have faded later in the day: the lower half helps you stay up and climb better.
- Students and new pilots: many manufacturers recommend flying around the middle of the range. Avoid the very bottom (soft wing, easily pushed around by wind and more prone to collapses), and don't ballast up to the top before you are used to stronger wing reactions. Talk to your instructor before changing your loading.
- Cross-country flying: many pilots choose the upper half for speed and headwind performance, accepting slower climbs on weak days.
💡 Practical tip: to see where you sit in the weight range, take (total take-off weight − bottom of range) ÷ (top − bottom). For example, 88 kg in total on a 75–95 kg wing: (88 − 75) ÷ 20 = 65%, i.e. about two thirds of the range.
⚠️ Points to watch when you change your loading
- Always stay inside the certified range. EN/LTF certification tests are flown at both the bottom and the top of the range; outside it, the wing's reactions have not been tested and the certification no longer applies.
- Weigh your whole kit on real scales rather than guessing: pilot, clothing, harness, reserve parachute, wing, instruments, water. Check the manual to see how the manufacturer counts the weight.
- Ballast: use only a purpose-made water ballast bag fitted in the harness, close to the centre of gravity; no loose items, nothing heavy hanging outside the harness. Include the ballast in your total and never exceed the top of the range.
- A new loading means new speeds: the figures in the manual (trim speed, minimum sink) are measured at a given loading; at another loading, multiply by √(W₂/W₁) to estimate them.
- After changing your loading, fly a few flights in mild conditions to get used again to the speeds, the brake pressure and the timing of the flare.